# How to accept a deal offer
### **Explore Offers page**
On this page, you can explore live exchange offers posted by other Bridgoro users. Compare available rates, choose the deal that suits you best, and start your swap instantly through our secure escrow system. All offers are updated in real-time for a fast and transparent trading experience.
1. **Pair** column shows cryptoassets for exchange. You have to send the asset on the left to get the asset on the right.
2. **Price Margin** is the difference between the market price of the cryptoasset and the added price of the seller (0% - market price / -0.1% or more is cheaper than the market price / 0.1% or more is higher than the market price).
3. **Available** column shows the available amount of the cryptoasset you get in case of exchange.
4. **Cost** of the asset to be exchanged.
5. **Fixed Offer** means you can exchange the full available amount. Not Fixed Offers (or Flexible Offers) mean you can exchange a part of the available amount or the all amount.
6. **Status** shows the current state of the offer.
7. **Min. Level** is a minimum user’s level required to accept trade.
8. **Trade** button is for reviewing and accepting the offer. The button on the right **(i)** shows the details of the offer.
***
**To start the exchange, choose the desired offer and press the Trade button.**
***
### Accept Offer popup
After pressing the Trade button, a popup with offer details will appear.
1. **Flexible amount** means that you can exchange a partial amount from the offered amount or all.
2. **From:** The cryptoasset that should be sent by you.
3. **To:** The cryptoasset you get after the exchange.
4. **Cost of the available amount** is the amount you should send.
5. **Available Amount** shows the total available amount in this offer.
6. **Exchange Rate** between cryptoassets to be exchanged.
7. **Available amount** value in USD shows the equivalent in US Dollars.
8. **Service Fee** is a fee charged by the exchange for exchange services.
9. **Price Margin** is the difference between the market price of the cryptoasset and the added price of the seller (0% - market price / -0.1% or more is cheaper than the market price / 0.1% or more is higher than the market price).
10. **Minimum Buyer Level** is the minimum user level required to accept the trade.
For accepting the offer press **Accept Offer** button.
***
### Create Deal popup
The next popup screen after your acceptance of the offer will appear:
1. Enter the **amount** you want to exchange in the sending asset (or USD equivalent) or in the receiving asset (or USD equivalent). The amount should not be more than the available amount and not less than $30 in USD equivalent. For better UX, we added: | min | half | max | buttons under the sending amount field.
2. Enter your cryptoasset **Receiving Wallet Address**.
3. If you are exchanging Monero (XMR), then you have to additionally enter the **Monero Rollback Wallet Address** in case of trade cancellation.
4. **Fee Compensation** is a network fee of the seller that the buyer pays for accepting the offer created by the seller. Buyer pays because the seller gives liquidity.
After specifying the required amount for exchange and entering the receiving address,
\
click the **Create Deal** button.
***
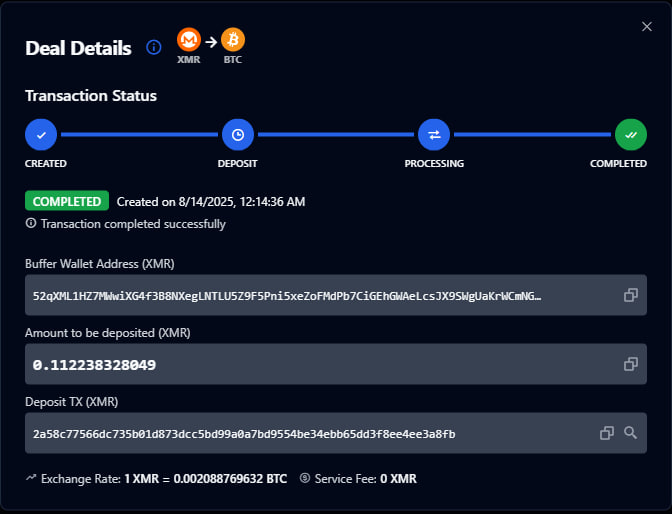
### Deal Details popup
The next screen is the final screen of processing your deal.
1. **(i)** button will show Wallet Addresses & Transaction Details of the current deal.
2. Transaction Status shows the current state of the deal. After confirming the deposit, the status changes to **DEPOSIT CONFIRMED BY USER**, and after 1 confirmation of the sent transaction, the status becomes **PARTIALLY CONFIRMED**. When a transaction gets several confirmations, the status changes to **PROCESSING** status *(PARTIALLY CONFIRMED RELEASE)* and exchanged assets will be released to the buyer.
\
After receiving the exchanged asset by buyer the status changes to **COMPLETED**.
3. The timer shows the estimated time you have to send the funds for exchange.
4. Send the assets you want to exchange to the **Buffer Wallet Address**. *(Use the **COPY** button on the right side.)*
5. Please send the exact amount of the exchanging asset shown in the **Amount to be deposited** field. *(Use the COPY button on the right side.)*
When you complete your transaction, press the **Confirm Deposit** button and wait while your deposit is processed. When your funds arrive at the Buffer Wallet Address, the exchange mechanism automatically sends your exchanged funds to your wallet address.
***
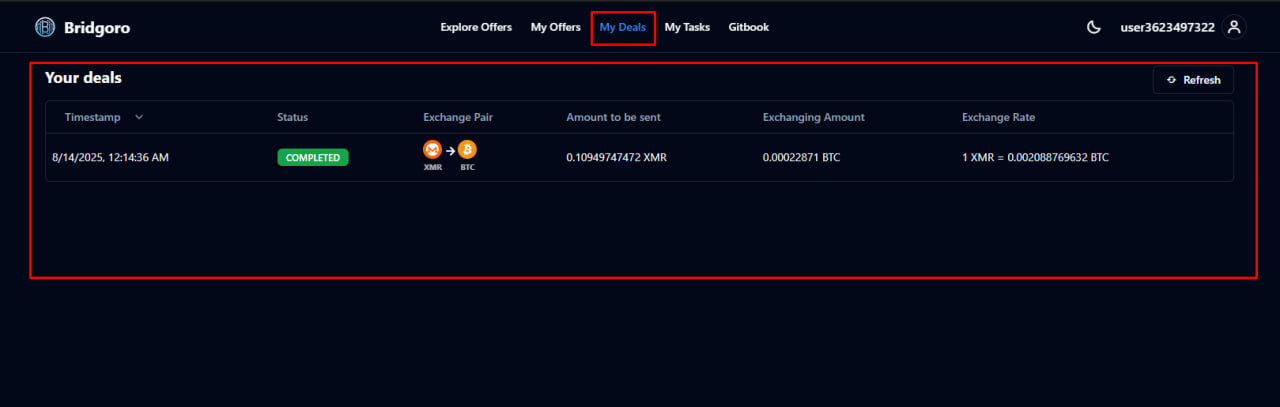
### My Deals page
My Deals page shows all your accepted deals that are in progress, aborted, or completed.
By clicking on any part of a certain deal, you can get the details of that deal.
This is how Deal Details looks on the My Deals page, the same as when you accept the deal and complete your transaction part.